
To do the job right, you need the right tools. So whether you need a beginner piping nozzle guide or you’re a professional baker, we’ll delve into all things piping nozzles. This article will guide you through how to use a piping bag with lots of piping bag tips. We will cover everything from types of piping tubes for cake decoration to disposable piping bags for filling pastries.
How to Assemble a Piping Bag
To assemble your piping bag, you only need two things, a bag and a nozzle. First, trim the tip of your piping bag to create an opening.
Top tip: start with a small trim, you can always cut more away if needed.
You want to ensure the opening is small as the nozzle has to sit snugly in the opening. You do not want your nozzle falling through the opening or being pushed out whilst you’re piping!
Then, add your chosen nozzle to the bag. If you’re new to piping, keep reading for a more in-depth guide to piping nozzles. We’ll help you choose the right one for your desired effect.
Insert the nozzle into the bag and push it down until it is sat firmly in the opening of the bag. When you’re ready, fill the piping bag with your chosen mixture. Top tip: use a cup and fold the piping back over the edges to keep the cup open whilst you pour in your mixture.
Beginners Guide to Pipping Nozzles and Bags:
Let’s start at the very beginning. First, you will need your equipment. There are various types of piping bags including:
– Disposable Heat Resistant Piping Bags
– Disposable AntiSlip Piping Bags
There are a few things to consider when choosing which type of piping bag to use. Disposable piping bags can be an inexpensive option if you’re a casual baker. Disposable piping bags are also great for a quick clean up as they can be thrown away after use. Whereas reusable bags are more reliable and cost-effective over time for professional bakers. It’s also important to use the right size piping bag. There is a range of sizes available for piping bags. As a quick piping guide, 18-inch bags are perfect for icing large surface areas on cakes or a whole batch of cupcakes… meanwhile, 12-inch piping bags are best for finer details.
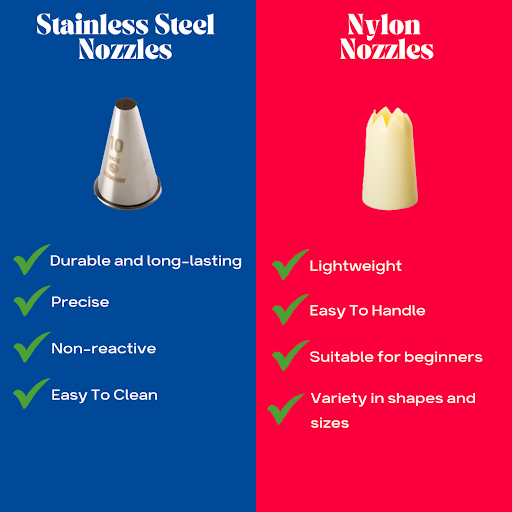
Our piping nozzle range includes both stainless steel and nylon options. There are no right or wrong tools to use. As long as you are comfortable with your equipment, your piping will always be on point.
How to Use a Piping Bag:
The main reasons for using a piping bag are for decorating sweet treats or filling pastries.
After you have assembled your piping bag and filled it, you must close it properly. A common technique is to pinch the bag together and twist the excess off. Twist until the filling is almost coming out of the nozzle. If you see air bubbles in your piping bag, gently squeeze the bag to remove them.
For the best control over your piping bag, place your dominant hand towards the top of the bag. Then, use your other hand to guide the bag to create your designs. As you pipe, make sure that the tip of the nozzle is not pressed against the surface of your surface. This will create resistance against the filling coming out of the nozzle. If you are decorating cakes, it will also make it harder to control the design.
The best technique is to hold the piping bag slightly above your surface and at an angle.
We made a list of some common mistakes made by beginner pipers and how to avoid them:
– Overfilling the bag: do not fill your piping bag to the top. Only fill it halfway, you can always add more!
– The tip falling out: make sure your chosen nozzle fits snugly in the opening of the piping bag. To do this, start small with your cuts, you can always cut more off.
– Not closing the piping bag: make sure you twist or clip off your piping bag so your buttercream or icing doesn’t leak out!
– The buttercream or icing won’t come out: ensure that the consistency of what you are piping is soft. If it is too hard it won’t flow well for piping. On the other hand, if icing is too runny, it will not hold its shape.
Pipping Nozzle Guide:
There is a wide variety of nozzles to help you achieve your desired decorative look. Wider tips can be used for efficient icing. Smaller nozzles are perfect for adding smaller details and finishing touches. If you’re wondering which piping nozzle to use, we have put together a guide to the most popular piping nozzles for you.

If you are a professional baker, then you may want to invest in a whole set of piping nozzles. However, if you just enjoy baking in your spare time then you can grow your collection over time. The larger tips are a good place to start for beginners who ‘want to add a little flair to your cakes, biscuits and cupcakes.
Piping Bags in a Commercial Bakery
In a commercial kitchen, time is of the essence. Consider using piping bag couplers to switch nozzles quickly without having to refill or reassemble your bag. For high-volume tasks, opt for larger bags (18–24 inches) to minimise downtime caused by frequent refilling. Ensure your nozzles are firmly secured with a coupler or a properly trimmed bag to avoid interruptions during production.
You’re Ready to Start Piping!
With these tips and tools, you can streamline your piping process and upgrade your designs. From selecting the right nozzles to maintaining consistency during high-volume production, these techniques will help you deliver exceptional results every time. Explore our range of professional-grade piping bags and nozzles to gear up for success in your kitchen today!


